Skip to content

Author: adam

  • Say Goodbye to chown: Fixing WordPress File Permissions in Docker on Windows with WSL

    Say Goodbye to chown: Fixing WordPress File Permissions in Docker on Windows with WSL

    If you’re developing WordPress themes or plugins locally on Windows using Docker inside of WSL, you’ve likely run into a frustrating and time-consuming problem: the constant battle with file permissions.

    One minute, you need to set your theme files to adam:adam so you can edit them in your IDE like PhpStorm or VS Code. The next, you need to switch them to www-data:www-data so that the web server can run a server-side process, like an automatic SCSS compiler. Then, to update a plugin from the WordPress admin panel, you have to switch the permissions back again.

    This constant chown shuffle is a major drag on productivity. I recently faced this exact scenario with a specific local development stack:

    • Host OS: Windows 11
    • Linux Environment: WSL (Ubuntu)
    • Containerization: Docker Desktop
    • WordPress Image: The official wordpress:latest
    • Workflow: WordPress files mounted from my local WSL filesystem into the container.

    The goal was simple: edit files as my local user while allowing the WordPress container to perform its necessary file operations without constant permission changes. After some trial and error, I landed on a clean, permanent solution. This fix has been tested for the environment above and works perfectly.

    The Core of the Problem: A User ID Mismatch

    The friction comes from a fundamental conflict between users. On your WSL instance, your user (adam in my case) owns the project files. This user has a specific User ID (UID) and Group ID (GID), which are typically 1000 and 1000 for the default user on most Linux distributions.

    However, inside the official wordpress:latest Docker container, the Apache web server runs as the www-data user by default. This www-data user has a different UID and GID (usually 33). When WordPress needs to write a file—like scssphp compiling a stylesheet or a plugin being updated—it does so as www-data. Since the UIDs don’t match, you get permission errors unless you manually change the file owner to www-data.

    Worse yet, I noticed that on some occasions, a process would create a file owned by root, adding yet another layer of complexity. The solution is to stop juggling users and just make them the same.

    The Solution: Synchronize Your User with the Container

    The most robust fix is to tell Docker to run the Apache process inside the container using your own user’s UID and GID. This way, from the file system’s perspective, your local user and the web server user are identical. Any file you create can be read/written by the server, and any file the server creates is owned by you.

    Here’s how to do it in two simple steps.

    Step 1: Find Your User and Group ID in WSL

    First, you need to find the UID and GID of your user inside your WSL terminal. It’s almost certainly 1000:1000, but it’s always best to verify.

    Open your WSL terminal and run the following command:

    Bash

    id -u && id -g
    

    This will print your UID and GID. Take note of these numbers.

    Step 2: Update Your docker-compose.yml

    Next, open the docker-compose.yml file in your project root. We are going to add a single, powerful directive to your WordPress service configuration: user.

    Find the service definition for your WordPress container and add the line user: "1000:1000", replacing 1000:1000 with your actual UID and GID if they are different.

    Here is a before-and-after example:

    Before:

    YAML

    version: '3.8'
    services:
      wordpress:
        image: wordpress:latest
        volumes:
          - ./wp-content:/var/www/html/wp-content
          # other configurations...
        ports:
          - "8080:80"
        restart: always
    

    After:

    YAML

    version: '3.8'
    services:
      wordpress:
        image: wordpress:latest
        user: "1000:1000" # Add this line!
        volumes:
          - ./wp-content:/var/www/html/wp-content
          # other configurations...
        ports:
          - "8080:80"
        restart: always
    

    Step 3: Rebuild and Verify

    Save your docker-compose.yml file. Now, stop and rebuild your container to apply the change. Run this command from your project directory in the WSL terminal:

    Bash

    docker-compose down && docker-compose up -d --build
    

    Once the container is running, you can verify that it’s working. Have WordPress perform an action that creates a file. In my case, I deleted my old compiled CSS file and reloaded a page, which triggered the scssphp compiler.

    Then, check the file’s ownership in your terminal:

    Bash

    ls -l wp-content/themes/your-theme/path/to/main.css
    

    The owner should now be your local user (adam adam). Success! You can now edit the file, and the server can still overwrite it when it recompiles, with zero permission conflicts.

    A Smoother Path Forward

    By synchronizing the container’s user with your local user, you eliminate the source of the permission conflict entirely. This simple, one-line change to your docker-compose.yml creates a seamless and efficient local development workflow. No more context switching, no more running chown—just smooth, productive coding.

    Disclaimer: This solution has been specifically tested and confirmed to work with a development environment running on Windows, using Docker Desktop with the WSL backend, and running the official wordpress:latest image with locally mounted files. While the principles apply more broadly, the exact implementation may differ in other environments.

  • I published an accessibility plugin called Open Accessibility!

    Within the last couple of months, I was updating plugins for one of my employer’s WordPress sites. The accessibility plugin that I had been using and that had been an incredibly popular plugin had been called One Click Accessibility. There was a major version update from 2.x to 3 and when I installed it, I was met with a wildly different plugin. Long story short, the plugin was sold to Elementor and then went commercial.

    This really, really pissed me off. I could have just stayed on version 2 of the plugin perpetually but so many other people got screwed as well. There are many other accessibility plugins available in the WordPress plugin repository but I decided to make my own out of spite.

    Accessibility platforms like UserWay and Accessibe are prevalent and big business but while they will give you a widget or something to add to your site to assist those who need with things like text size, color contrast and the like, what they are selling is a “cover your ass” service in the even that you get sued. They aren’t marketing a product to help people, they are selling fear and then a handy peace of mind solution to those who think they need it.

    I don’t know, I have a fundamental problem with making money directly or indirectly from people who have a disability or who are differently-abled. The argument can be made that commercial accessibility offerings aren’t protecting site owners from people with disabilities but rather the trolls that will sue anyone for anything and then offer a settlement to make a quick, shitty buck. Those people exist and they suck but site owners that genuinely give a shit about their users should have options a-plenty.

    The project was always intended to be open source and while it can’t provide any type of legal services, it can at least help make the best effort possible to accommodate all type of different use cases for people with different needs.

    You can find my official plugin here. This project is (and will always be) open source and my GitHub repo can be forked if you want to make it your own. I plan to actively work on this and incorporate feedback as well as new features so please let me know what you think and what you might want to see!

    By the way, I am using the plugin on this site so you can take it for a test drive and see if you think it could work for you and your sites.

  • Set Tag Order WordPress Plugin

    A few months ago, I was asked to solve what I thought was a simple problem. The question was, “Can we set the display order of tags?” It seemed like a very benign question until I started to dig into it and discovered that it’s, in fact, not a simple question at all. WordPress, by default, sorts tags alphabetically when you use the get_tags() function.

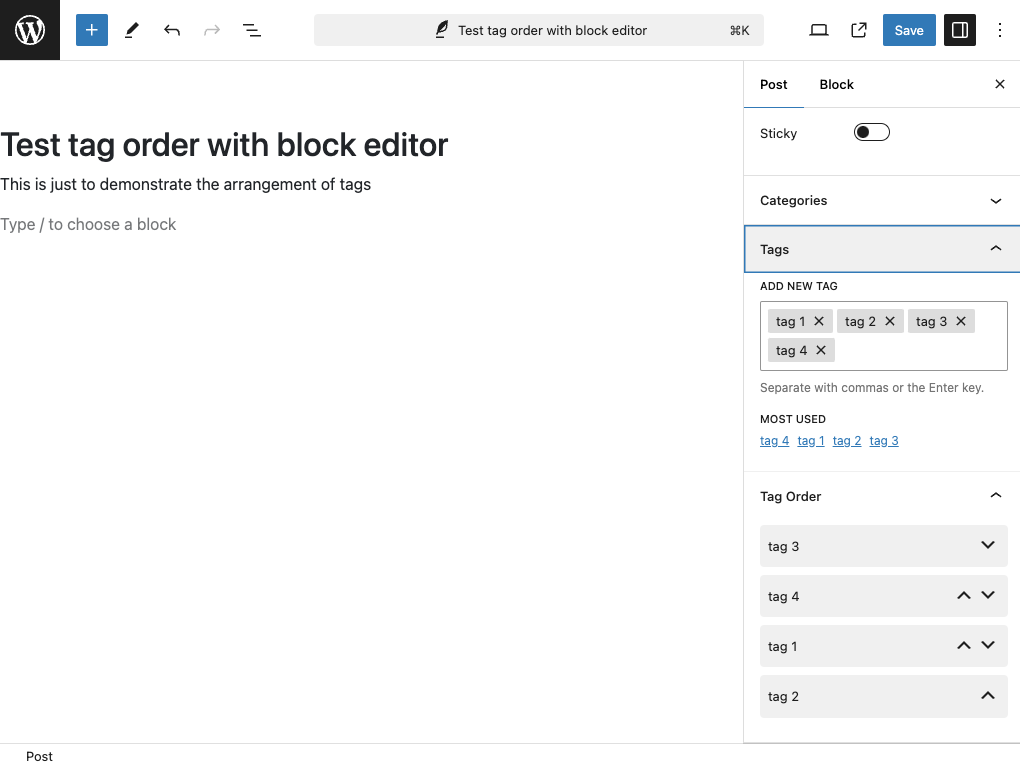
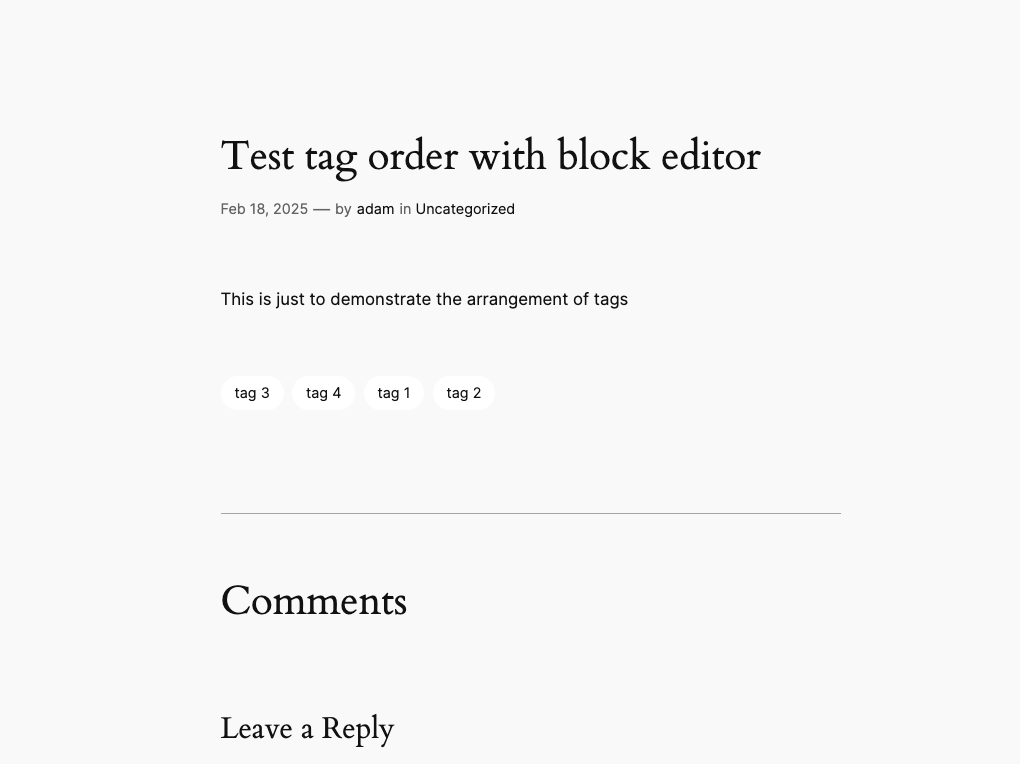
    The problem I was asked to create a solution for was to allow the editor to specify the order that tags are rendered on the corresponding post page. It was way more involed thatn I had anticipated but ultimately, I created a plugin that works with both the block editor and classic editor and should also work with any theme that displays tags using the get_tags() function.

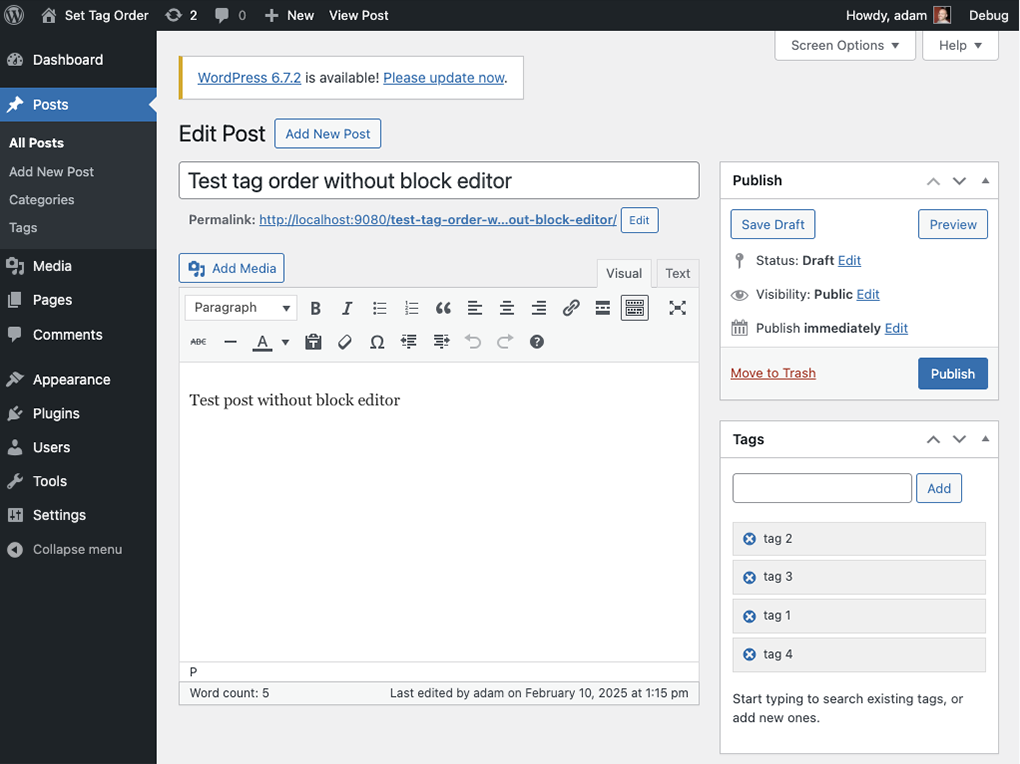
    I’ve attached some screenshots to help illustrate but the plugin can be downloaded directly from my GitHub. I have made this public and welcome any and all feedback or feature requests!

    This plugin is now also listed in the WordPress plugin directory! You can download it from WordPress.org here or add it directly from your WordPress installation.

  • New Teams or Old Teams, I Dislike Teams

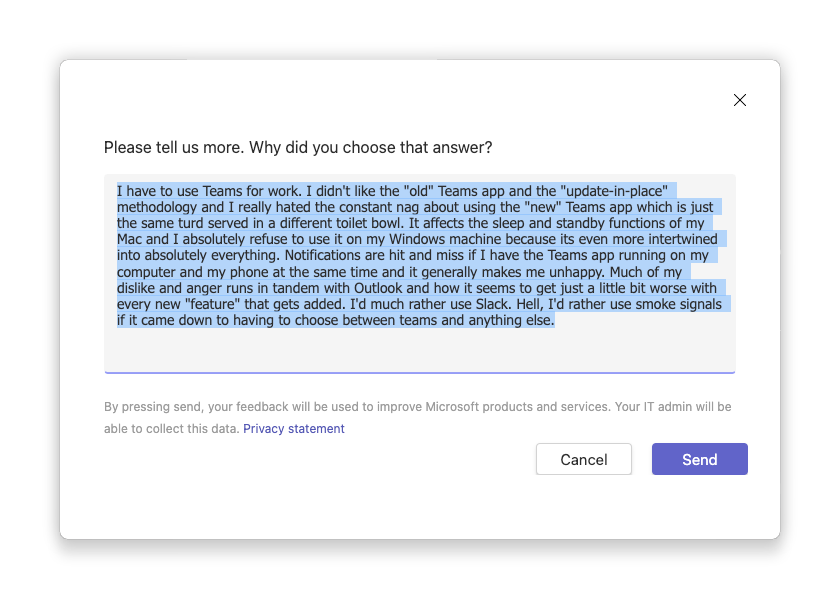
    The company I work for uses the Microsoft 365 suite of products including Teams. Just today, I was prompted in the ‘new’ Teams app to provide feedback. I provided feedback…

    Teams Feedback Form
    Teams Feedback Form

    “I have to use Teams for work. I didn’t like the “old” Teams app and the “update-in-place” methodology and I really hated the constant nag about using the “new” Teams app which is just the same turd served in a different toilet bowl. It affects the sleep and standby functions of my Mac and I absolutely refuse to use it on my Windows machine because it’s even more intertwined into absolutely everything. Notifications are hit and miss if I have the Teams app running on my computer and my phone at the same time and it generally makes me unhappy. Much of my dislike and anger runs in tandem with Outlook and how it seems to get just a little bit worse with every new “feature” that gets added. I’d much rather use Slack. Hell, I’d rather use smoke signals if it came down to having to choose between teams and anything else.”

    I finally caved and switched to new Teams two days ago after I started getting nags in the old Teams app every damn day. I would start up old Teams and get an overlay modal saying that other people in my organization have switched to new Teams and then, periodically, I’d get a little dialog box docked to the settings icon saying its super easy to switch to the new Teams and that I should do it.

    These are great tactics that dirtbags use to get people to consume drugs and apparently Microsoft thinks it will work to get people onto the new Teams bandwagon as well.

    Notifications are awful

    Beside my beef with being forced into installing a new app, the last time I tried to use new Teams (about 4 or 5 months ago), the new Teams app was incredibly worse than the old Teams app. My experience is centered around using Teams on a Mac so keep that in mind. Teams, new or old, has always had issues with notifications. Not long ago, over a period of three days, I had received several Teams messages but didn’t get a single notification, no app badge on my phone, and nothing showing up in my notification center. The only place I could identify that I had a message was he little red dot on the app icon in the Dock on my Mac. I hide my Dock so unless I made the conscious effort to check it, I didn’t know I had any messages.

    Speaking of notifications, you may think that you can delete a message and the recipient won’t see it, right? Wrong. Just yesterday, when using the new Teams app, I got a notification of a new message. I went to read the message on my computer and it was gone. Some time later, I went to clear the notifications from my Apple Watch and the deleted message was there. What I could read had been truncated to whatever length the notification limit is but I could still read the bulk of the deleted message. It wasn’t thing questionable at all but if it had been, that could have been a problem.

    Resource consumption is out of hand

    The speed and resource consumption of the old Teams app was absolutely horrid. There’s no reason that Teams should ever need to consume multiple gigabytes of memory or peg the CPU. My MacBook Pro has a M1 Pro CPU with 32GB of RAM and there had been times where 7 or 8 gigabytes had been consumed by Teams. This usually only happened when it tried to update but I believe that the old Teams app had shoddy code that lead to memory leaks that would seemingly trigger at random. I haven’t had enough experience with the new Teams app yet to know if that will continue to be an issue but I’ll surely update this post if it is.

    Call quality is laughable

    Lastly, a notable issue that has continued to plague me across Teams new and old is meeting audio quality. I like to use headphones or earbuds when on meetings and I usually use my AirPods Pro. No matter what audio source I use, the quality of the audio I hear is terrible regardless of who is on the other end. The audio I hear is tinny, broken and hard to hear at times. If the call is myself and one other person, audio quality is okay but as soon as multiple participants and video is introduced, call quality takes a flying leap out the window.

    My only conclusion as to how Microsoft can put out a product like this is cynical but makes sense. What else are you going to use? Like my company, if yours is using Microsoft 365 (formerly Office 365), why would you spend more money to use something else when Teams comes baked into your 365 subscription? What are you going to do, switch to Google Workspace? Probably not but you probably should. Having personal experience having managed both anenterprise Microsoft 365 instance as well as Google Workspace, I can confidently say you should ditch Microsoft 365.

    What’s your experience with Teams? If you use and like Teams, I’d be interested to hear that as well.

  • One Input Device for Mac and PC Simultaneously

    Sharing one input device across multiple machines seems like a great thing at face value. If you have a Mac and an iPad (or even two Macs) then Apple’s own Universal Control works fantastically and (usually) without a hiccup. My biggest problem that I have encountered is two devices just not automatically communicating which I have always been able to fix by toggling on and off Universal Control from one of my Mac’s settings.

    That’s all well and good but what if you have a Mac and a PC and want to share input devices across the two? If you plan on using one device at a time, a KVM switch will always be the best way to go. Hardware solutions are exactly that – a physical device that connects to two (or more) machines into which your input devices are connected.

    What if you’re like me and use a Mac and a PC at the same time? Here are some solutions I’ve tried with varying degrees of success and usability.

    VNC into your second computer.

    How I would implement this is run VNC server on my PC and then connect from my Mac to the PC. This works best for me if I have multiple monitors running and then dedicate a screen to the VNC session. The benefits to this, for example, is that if your secondary machine is a desktop and your primary machine is a laptop, then you can access your secondary machine from anywhere while only carry one computer. My VNC platform of choice is Real VNC and I’ve had no issues establishing a connection from anywhere. The drawback to this is latency. If I’m connecting over my local network, latency is much less of an issue but when I’m out and about then I am at the mercy of whatever internet connection I may be using. I’ve also connected to my phone’s 5G hotspot and even though my cellular connection may consistently give me well over a 100Mb/s transfer speeds, my ping is usually hovering around the 900ms mark which makes doing any sort of sustained work nearly impossible. For things like a quick move of a file, no problem, but the constant latency from keystroke or mouse click to response from receiving machine is unbearable.

    In summary, this is a great free solution when working locally but is not reliable (for me, at least) when I want to work remotely on a computer than is stationary in my house.

    Use a KVM switch.

    I haven’t used a hardware KVM solution for a few years but changes to KVM offerings don’t change very quickly except when the intent is to share a single monitor with a single connection. A cheap KVM switch can be had from Amazon for less than 50 bucks while enterprise-grade solutions can hit eye-watering, multi-thousand dollar price tags. The pros are that there is no latency – your input devices are physically connected to the target machine. The drawback is that you can only use one computer at a time and you (typically) have to manually (with a physical button) toggle between your target machines.

    The monitor I use is a Samsung Oddysey G9 with a native resolution of 5120 x 1440 at 240Hz. Cheaper KVM switches don’t support ‘exotic’ resolutions and those that do won’t typically go above 60Hz. Luckily, my monitor has to DisplayPort inputs so I keep one connected to my Mac nad one to my PC and just toggle the source on the display and I toggle the inputs between my machines.

    When I want to work, and test code across two machines at the same time, a physical switch just doesn’t fit into my workflow. When I’m done for the day and want to play a game, especially a FPS, a KVM switch works great and doesn’t cause any input lag.

    Symless Synergy 3

    I bought a license for Synergy all the way back in 2018 and had totally forgotten about it. Perhaps that was a bit of foreshadowing but this piece of software was at the top of the search results when I looked for “share mouse and keyboard between PC and Mac”.

    Installing the software is straight forward regardless of platform and I even tried running an old Dell Laptop with Ubuntu in-line with my MacBook Pro and Razer blade to see if their ‘works on all platforms’ meant ‘works on all all platforms at once’. I was surprised but it did. I set my MacBook Pro as the host and connected the Ubuntu machine to the left and my PC to the right. It just worked.

    Even though it works as advertised and it works reliably, it wasn’t without its own caveats.

    When I have my MacBook Pro sitting next to my Razer Blade 16, it works great. I can have both devices side-by-side and, much like Continuity between two apple devices, the cursor floats between the two screens with no trouble. I can test code on both machines at the same time and all is well in the world.

    My Mac is my primary work computer so when I’m working at my desk and have my Mac connected to my external monitor, then I notice hiccups with what I believe is input lag. It’s most noticeable on my PC where I can very clearly see jerkiness when moving the cursor which increases as the cursor accelerates. Input lag from the keyboard is not noticeable but my only “testing” is what I can perceive. Keep in mind, when I am stationary, at my desk, my machines are connected via Ethernet to my home network no network latency should not be a factor. Even so, when I am on WiFi just using my Mac and PC (no external displays) side-by-side, I don’t notice any cursor lag.

    I’m going to dig into this further and plan to post a more in-depth review of Synergy 3 so stick around for that coming soon.

    There is no “one size fits all” solution for me.

    What I have determined is that each solution fits a different use case. When I’m at home working on my ultrawide monitor, a VNC session sharing half of my display works great. When I have both machines present then placing them side-by-side and using Synergy 3 is great. When I’m at my desk and want to switch to my PC for a gaming session, then a KVM switch with my keyboard, mouse and controller fixed in place fits the bill.

    Thankfully, all three of these solutions cost me about 85 bucks. A license for Synergy 3 is $29.99 and the KVM switch I use cost a little over 50 bucks. A personal, 5 device license for RealVNC is free and I’ve used RealVNC for years and have never had an issue aside from maintenance windows on their end.

    Your situation is going to be different and some, all or none of what works for me might work for you. If you’ve got a unique scenario or solution, let me know in the comments.

  • Grip Strength Percentile Calculator Project

    Years ago, I worked with a doctor that specialized in sports medicine and physical therapy. He asked me to create a bespoke grip strength calculator that he could use and present to patients of his. I used charts and data available from the NIH to do the math and meet the task requirements. I wrote this in vanilla JavaScript and in a way that it could be embedded in nearly any site that allowed custom HTML. This was initially going to be embedded in a Magento content page and it worked out well.

  • Change Mouse Scroll Wheel Direction In Windows

    I’ve been using my PC more lately and one thing that Windows lacks is the ability to set the scroll behavior related to mouse wheels. I use “natural” scrolling on my Mac’s Magic Mouse (and always have since its introduction) so using my PC recently has been frustrating since my muscle memory is so well ingrained.

    The mouse I use currently is a Razer Orochi V2 and the Razer Synapse software provides the ability to remap the up and down scroll direction but that seems really clunky for something as simple as “move mouse wheel up, scroll page down”.

    The scroll direction can be set in the Windows registry and for those of us that have edited the registry manually before, it’s not that difficult of a challenge – it’s much more of a chore to have to find the correct registry keys. For those that haven’t or don’t want to edit their registry manually, I have a handy PowerShell script that automates the process.

    Disclaimer: I am not the original author of this script but I did change verbiage and output to be more clear for the end user.

    It’s a basic PowerShell script and the only caveat is that is requires admin privileges to execute (naturally, since it deals with editing the registry).

    As I update Windows on my PC’s, I’ll add the versions that work to the README.md in the repo. Feel free to leave a comment with your version of Windows and if you run into any issues.

    Update as of 12/22/2023: I found that the registry entries for some mice exist in a nested entry within the “Enum” key. My experience specifically has shown that Lenovo-branded mice do this. I am working on a fix but I’m not sure if other OEM’s do something similar. Drop a comment below if you know. Any information is helpful and appreciated!

  • Out With Ghost, In With WordPress

    As much as using WordPress is cliche, my current job revolves around WordPress so it seemed fitting to use it personally as well. I had been using Ghost since I had been fully immersed in NodeJS, Next, React and researching any ‘new hotness’ JS frameworks or libraries that seemed to materialize out of thin air every few days.

    I like Ghost and it did everything I wanted and was very easy to set up and maintain on my Raspberry Pi web server. I appreciated not having to use plugins for features that WordPress should have built into the core long ago. I really appreciated the content editor which was very fast, and had all of the content editing and layout features I wanted. The templating engine was a bit of a learning curve but once I looked at some different themes and poked around under the hood, I was able to figure out how to get the frontend to do what I wanted it to do.

    Having been a PHP person for almost my entire professional career, WordPress was always looming over my shoulder. When I started to delve deep into NodeJS and other JavaScript or TypeScript-based frameworks, using Ghost for my own site seemed befitting. It was easy enough to set up and self-host on a Raspberry Pi so that’s what I did.

    Alas, I find myself fully immersed in WordPress on a daily basis. I wouldn’t have considered myself a WordPress developer before but I certainly would now. In less than a year’s time, I’ve learned sooooooo much about what WordPress can do and some quirks and shortcomings about what it can’t. As much as I want to be one of the cool kids running a JavaScript-based thing for my own site, it makes more sense to use WordPress and use it as a playground of sorts to experiment and get weird if I feel like it.

    Just like the answer to every car question is “Miata”, the answer to every website platform question is “WordPress”…

  • Reset WordPress Password Directly in Database

    My current job has found me in a sea of WordPress sites. Since we don’t allow (or want, at this time) users to register, the PHP mail() function is not enabled along with the security risks that PHP mail(); brings along with it. So what happens when a user needs their password reset? Currently, an admin has to manually set a new password. That’s fine and dandy but what happens if you only have one admin account and you’re locked out?

    The answer to that question is simple – reset the password directly in the database. Before you do that however, the new password needs hashed. You can use a simple MD5 hash to insert into your database which WordPress will run through its own wordpress_generate_password() function to create the proper form or you can use this tool that I built in order to create a ready-to-go WordPress password hash and example SQL query to run against your target database.

    Once you’ve got your hash, go into your WordPress database, and then find the ‘wp_users’ table. Inside of that table is a column called ‘user_pass’ – this is the field to enter your hash into.

    Execute the following SQL command (adjusted for your specific parameters):

    UPDATE wordpress.wp_users t SET t.user_pass = 'your-generated-hash' WHERE t.ID = 1;

    Replace “wordpress” with your database name and make sure you have the correct ID if you have multiple users otherwise, someone else is getting a new password.

    This can also be handy when installing WordPress within MAMP or MAMP Pro. I’ve found that in verisons 5 and 6 of MAMP Pro, when adding WordPress as an extra, the password you enter before MAMP installs WordPress never works. So, I’ve used this method to fix several WordPress installs when done through MAMP.